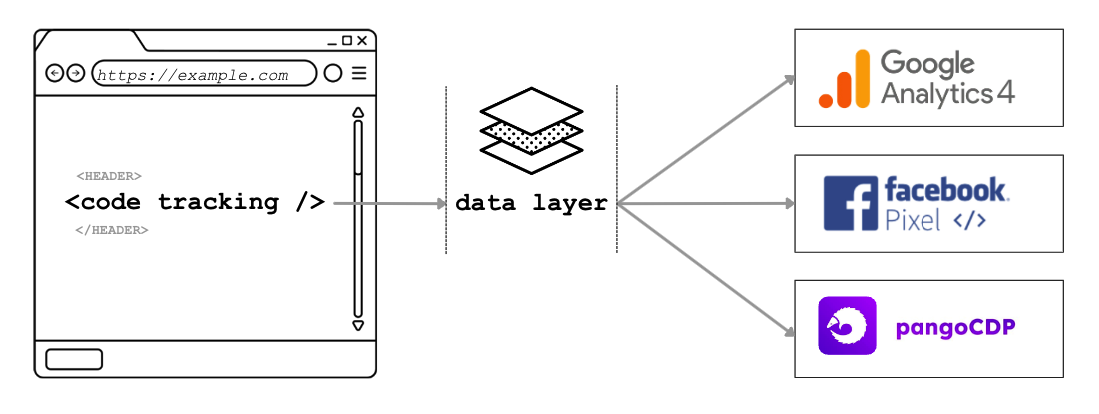
Web Tracking Code

This document guides you step by step on how to add tracking code to a website to capture user data and send it to PangoCDP, including User Cookie info, User Activities, Traffic Source, and more.

Overview

PangoCDP provides the <Code tracking> snippet that you can embed into your website. Through this snippet, Pango can capture website data such as user cookie information, user interaction data (e.g. page views, clicks on elements with tracking events, and information about the user’s traffic source).

Tracking Code Operating Model

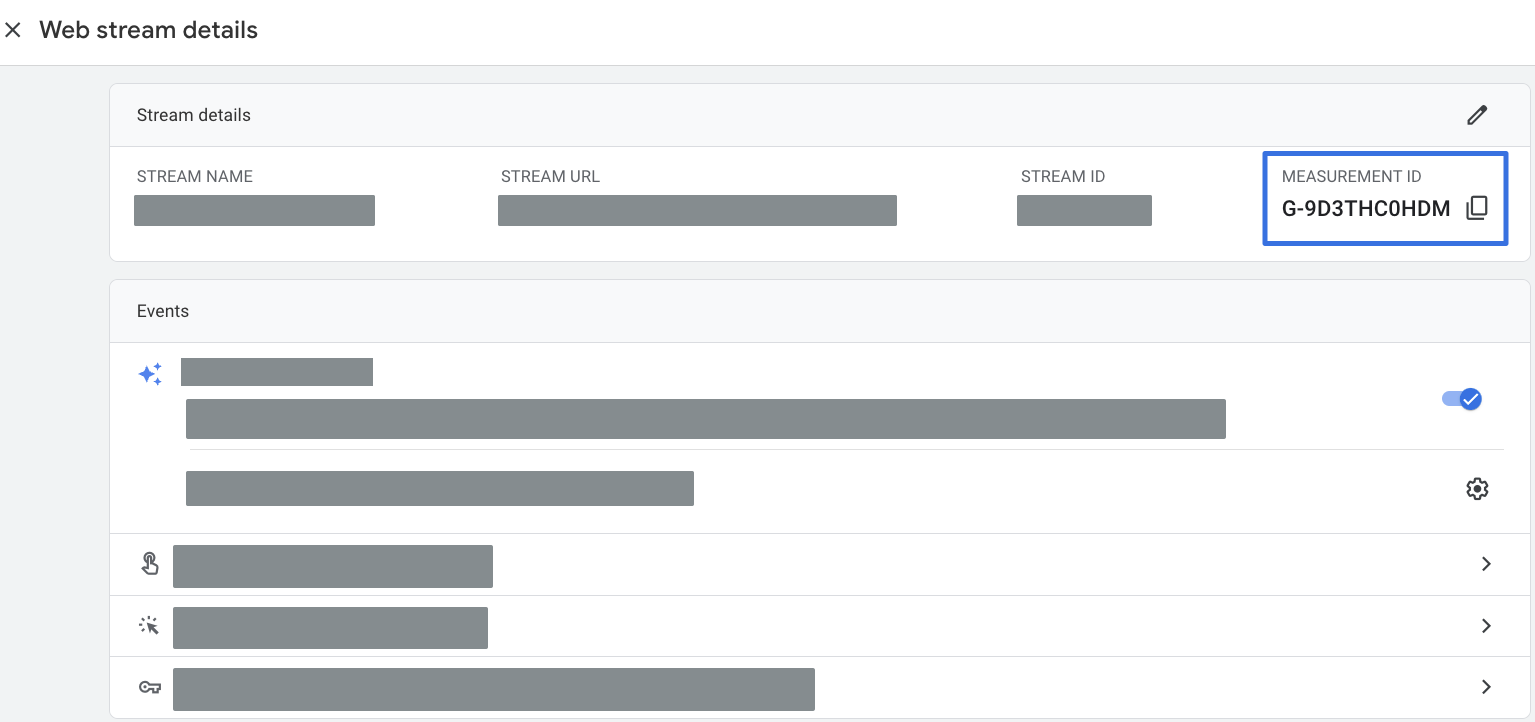
1. Create a Measurement ID in Google Analytics 4 (GA4)

Measurement ID is an identifier used in Google Analytics. To create one, follow the steps below:

Copy the Measurement ID you just created

2. Create a Facebook Pixel

Copy the newly created Pixel ID

3. Add the Pango tracking code to the website

Copy the code below and add it to your website <head> code </head>.

Note: You need to update the following information:

4. Event Tracking

View the list of recommended events from Google Analytics 4 herearrow-up-right

Enhanced E-Commerce

View the list of measurement events in Google Analytics 4 for e-commerce herearrow-up-right

Client Tracking Events

select_item

Use this event to track when a user selects an item from a list. The select_item event should be sent with the selected item included in the parameters, as shown below.

view_item

Use the view_item event to measure product detail views whenever a user views a product detail page.

view_item_list

Use the view_item_list event when a user is presented with a list of items. The event should include the items array parameter containing the displayed items.

add_to_cart

Measure when an item is added to the shopping cart by sending the add_to_cart event with the related items included in an items array.

remove_from_cart

To measure when a user removes an item from the shopping cart, send the remove_from_cart event.

add_to_wishlist

You can also measure when an item is added to a wishlist by sending the add_to_wishlist event with the related items in an items array.

view_cart

When a user views the cart, send the view_cart event with all items in the cart.

begin_checkout

Use the begin_checkout event to measure the first step of the checkout process. The event should include one or more items defined using the relevant fields. At this stage, coupons can be applied to the entire order by adding them to the event, or to individual items by adding them to the appropriate fields within the items array.

add_payment_info

Send the add_ payment_info event when a user submits their payment information. If available, include the payment_type parameter with this event to indicate the selected payment method.

add_shipping_info

When a user moves to the next step in the checkout process and provides shipping information, send the add_shipping_info event. Use the shipping_tier parameter to specify the user’s selected shipping option, such as “Ground,” “Air,” or “Next-day.”

purchase

Measure purchase transactions by sending the purchase event with one or more items, identified using the relevant fields.

generate_lead

Measure the action of users submitting a form on the page, using cdpData.properties for variables that are not defined in user_data.

select_promotion

To indicate that a user has clicked on a promotion, send the select_promotion event with this promoted item included as an item parameter.

view_promotion

E-commerce supports measuring both the number of impressions and the number of clicks for internal promotional campaigns, such as banners displayed to promote sales.

Promotion impressions are typically measured on the initial screen view by sending the view_promotion event along with item parameters to specify the promoted items.

custom_event

Measure custom events based on the specific needs of your website. Important note: {{custom_event}} and the property variables must match the regular expression [A-Za-z0-9_-]

Last updated

Was this helpful?